Looking for a fun, creative gift idea? Learn how to make a DIY candy bouquet using your favorite wrapped candies, a few simple craft supplies, and a decorative basket or pot. This homemade candy bouquet makes a thoughtful gift for birthdays, holidays, parties, and other special occasions. You can even use it as a party centerpiece before giving it away as a prize!
The best part is that you can customize your candy bouquet with different candies, colors, ribbons, and gift tags to make it extra special.
I absolutely LOVED making this. It was so fun.
Now onto this tutorial:
How to Create a Candy Bouquet
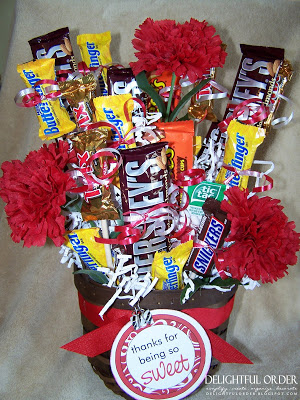
Supplies Needed to Make a Candy Bouquet
Gather these supplies before you begin:
Wrapped candy in your favorite varieties
Styrofoam or floral foam that fits inside your container
A sturdy basket, decorative pot, or container
Wooden dowels
Artificial flowers (optional)
Decorative paper shred
Curling ribbon
Hot glue gun and glue sticks
Scissors or wire cutters for trimming dowels, as appropriate
A gift tag and extra ribbon for decorating
Tip: Choose a sturdy container with a little weight. Candy bouquets can become top-heavy, so a heavier pot or basket with added weight at the bottom will help keep your arrangement stable.
How to Make a DIY Candy Bouquet
Step 1: Prepare the container
Choose a basket or pot for your candy bouquet. Trim the Styrofoam or floral foam as needed so it fits snugly inside the container.
Make sure the base is secure before adding your candy.


Step 2: Add decorative filler and flowers
Cover the visible foam with decorative paper shred.

If you like, add a few artificial flowers to give your arrangement the look of a traditional flower bouquet.
You can skip the flowers for a candy-only arrangement or choose colors that coordinate with your wrapped candy.I suggest getting something heavier than just a basket, as the bouquet gets a little top heavy. (I ended up adding left over rock from my flower pen gift idea) to the bottom of my basket, for the weight.
You wouldn't need to do this, if you had a ceramic pot or something heavier.
Step 3: Attach the candy to wooden dowels

Attach a wooden dowel to the back of each wrapped candy package. Use different dowel lengths to create height and dimension in your bouquet.

Secure the candy carefully, and add curling ribbon for a festive finishing touch. Keep hot glue away from any part of the candy that will be eaten.

You can use as little or as many pieces of candy as you'd like and you can use ANY kind of wrapped candy.
Step 4: Arrange the candy

Insert the dowels into the foam, starting with the taller pieces toward the back and shorter pieces toward the front. Arrange the candy evenly, turning the container as you work so the bouquet looks attractive from every angle.
A dab of glue on the end of each dowel can help secure it in the foam.
Step 5: Fill in empty spaces

Step 6: Add the finishing touches

Tie a ribbon around the container and attach a gift tag with a special message. You can personalize the colors and decorations for a birthday, holiday, teacher appreciation gift, or another celebration.
Your homemade candy bouquet is ready to give!
Easy Ways to Customize Your Candy Bouquet

One of my favorite things about this DIY gift is how easy it is to personalize. Use the recipient's favorite candy, coordinate the colors with a special occasion, or add a small gift alongside the candy.
You can also use the same basic idea to create themed gift arrangements. Try a golf-themed bouquet with golf balls and gift certificates, a spa-inspired bouquet with lotions and self-care gifts, or a new-baby arrangement with thoughtful items for new parents.
More Creative DIY Gift Ideas
If you enjoy making thoughtful homemade gifts, explore more gift ideas.
May you be a little inspired!
Until next time,
DaNita
You may also like:
Candy Bouquet Gift Ideas: A Creative DIY Candy and Gift Card Bouquet